On-Model Imagery Without a Photoshoot: AI Product Images for Clothing (2026)
On-model imagery sells apparel, but shoots are slow and costly. Here is how AI product images for clothing work, where they fail, and how to keep them accurate.
You have the product. You do not have the photos.
The sample is sitting on your desk, but the studio is booked three weeks out, the model casting is another week, and the page goes live before any of it is done. So you launch with one flat photo on a white background, and the page reads like a placeholder.
On-model imagery is what makes apparel feel real. It shows fit, drape, and scale. The problem was never that you did not want it. The problem was that getting it meant a shoot, and a shoot is slow and expensive.
Ecommerce should not start after the product is approved. It should start with the product. This guide covers what on-model imagery is, how AI product images for clothing actually work, where they fail, and how to keep them accurate enough to sell.
If you only read one thing
- On-model imagery shows fit, drape, and scale. It is the imagery that makes a shopper trust a garment, and it lifts a flat product into a real one.
- AI product images for clothing are a pipeline, not one prompt: clean cutout, ghost mannequin, on-model render, and recolor for every colorway.
- Start from your real garment photo. Accurate images come from your actual product, not from a model generated out of thin air.
- A human approves every image. Product fidelity, color, and fit have to be checked before the image ships.
- Kampana builds on-model imagery from one garment photo on a node-based canvas, with an approval gate on each product-accurate asset.
What is on-model imagery?
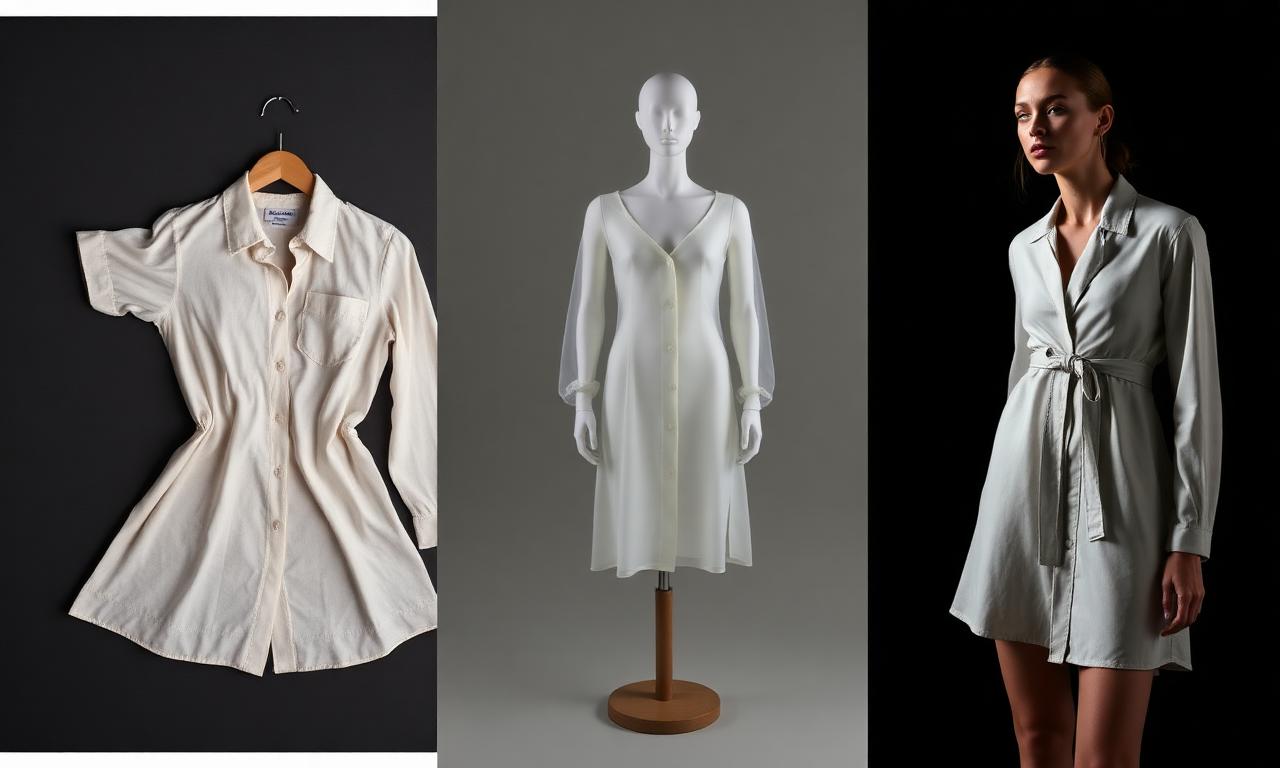
On-model imagery is product photography that shows a garment worn by a person. It is the difference between a flat shirt on a white background and the same shirt on a body, where you can see how it sits, how long the sleeves run, and how the fabric falls.
For apparel, on-model imagery does a job no flat shot can. It answers the silent questions a shopper has before they buy. Will this fit me. Is it cropped or long. Is the fabric heavy or light. Does it look like the picture when a real person wears it.
Most strong product pages use a set of images, not one. A clean front shot, a back, a detail crop, and one or more on-model views. Research groups that study ecommerce usability, like the Baymard Institute, consistently find that product images are central to how shoppers judge an item and decide to buy. The on-model view is the one that carries fit and scale.
A product page is not a product photo with a paragraph under it. It is a system. On-model imagery is the part of that system that makes the garment believable.
Why on-model images sell apparel
People do not buy clothing. They buy how clothing will look on them. On-model imagery is the closest a page can get to a fitting room.
Here is what the on-model view communicates that a flat shot cannot:
- Fit and silhouette. How the garment sits on shoulders, waist, and hips.
- Drape. How the fabric moves and falls, which signals weight and quality.
- Scale. How long, how cropped, how oversized the piece really is.
- Styling cues. How the product reads as an outfit, not just an object.
Flat and ghost images still matter. They are clean, fast to scan, and good for detail. But the on-model image is the trust builder. It is usually the one that earns the click into the page and the add to cart.
The catch is the cost of getting it. That cost is what pushes brands to launch without it, which is the exact problem AI imagery is built to solve.
Why the traditional photoshoot is the bottleneck
The classic way to get on-model imagery is a photoshoot. Book a studio. Cast and book a model. Schedule a photographer, a stylist, and a retoucher. Shoot. Edit. Deliver.
It works, and for a hero campaign it can be the right call. As a default for every product and every colorway, it breaks down for three reasons.
- It is slow. Booking, shooting, and retouching can take weeks, which lands after your launch date.
- It is expensive per product. A full shoot costs more than most small brands can spend on every style.
- It does not scale to colorways. Five colors of one style often means five times the shoot, or waiting for samples in every color to arrive.
So brands compromise. They shoot the hero piece and launch the rest with flats. The long tail of the catalog never gets the on-model image that would sell it. The result is a storefront where a few products look finished and the rest look like inventory.
The "wait for the other colors to arrive" delay is the clearest symptom. You have the product in one color. You cannot show the other four until samples ship. AI imagery is what removes that wait.
What "AI product images for clothing" actually means
"AI product images" is a vague phrase, so let us be exact. For apparel, it is not one button that invents a photo. It is a pipeline of steps, each one doing a specific job, starting from your real garment.
Background removal and clean cutouts
The first step is a clean cutout. Take your garment photo, flat or on a form, and remove the background. A clean cutout on white is the base asset for everything else: the PDP, the marketplace listing, and the ad.
This is the least glamorous step and the most reused. Every later image starts from a clean cutout.
Ghost mannequin
A ghost mannequin, or invisible mannequin, shows the garment with the shape of a body but no visible person. It looks like a catalog product shot, holds the garment's form, and works across every channel.
Ghost mannequin is the workhorse of apparel ecommerce. It reads as professional, it is neutral, and it shows the garment's shape without committing to a specific model.
On-model renders
This is the step that replaces the casting day. The garment goes onto an AI-generated model, so you can show the same product on different bodies without a shoot. The point is not novelty. It is showing fit and scale on a person, fast.
The accuracy rule matters most here. The model can be generated, but the garment has to stay your actual product. The shape, the color, the details, and the proportions have to match what ships.
Recolor and colorways
Recolor takes one approved image and produces every colorway from it, matched to a color standard and keeping the real shadows and fabric texture. One sample shot in, every color out.
This is what kills the "wait for the other colors" delay. You photograph one sample, and the rest of the color range comes from the same approved base.
On-model AI render vs studio photoshoot
Neither one is always right. Here is an honest comparison so you can choose per use.
| Studio photoshoot | AI on-model render | |
|---|---|---|
| Speed | Weeks | Hours |
| Cost per product | High | Low, credit-based |
| Colorways | Reshoot or wait for samples | Recolor from one shot |
| Body diversity | Recast and rebook | Generate multiple bodies |
| Best for | Hero campaign, brand world | Catalog depth, colorways, speed |
| Accuracy risk | Low, it is the real garment | Must verify product fidelity |
| Who approves | Art director | Human approval + product-fidelity QA |
The smart setup uses both. Shoot the hero story when the moment deserves it. Use AI for the long tail, the colorways, and the speed. The decision is per product, not all or nothing.
How to create on-model imagery from one garment photo
Here is the practical pipeline, in order, starting from a single product photo.
- Start with what you have. One decent garment photo. Flat, on a hanger, or on a form. It does not need to be the final shot.
- Remove the background. Make a clean cutout. This is the base for everything that follows.
- Make the ghost mannequin. Turn the cutout into an invisible-mannequin shot for a clean catalog look.
- Put it on a model. Render the garment on an AI model to show fit and scale on a body.
- Recolor for every colorway. Generate the rest of the color range from one approved image, tied to a color standard.
- Approve each image. Check product fidelity, color, and fit on every asset before it ships.
- Export channel-ready files. Size and format for the PDP, the marketplace feed, and ads.
Each step feeds the next, which is why a connected pipeline beats stitching together separate tools. The cutout feeds the ghost shot. The ghost shot feeds the on-model render. The render feeds the recolor.
Where AI fashion imagery goes wrong, and how to fix it
The garment drifts from the real product
The most common failure is an image that looks great but is not your product anymore. The collar changed, the logo moved, the fabric reads wrong. Fix it by starting from your real garment photo and approving every image against the actual sample, not against a vibe.
The color is off
A generated image can shift color, which is fatal for apparel where a returned order often starts with "the color was different." Fix it by tying recolors to a color standard, like a Pantone reference, and checking color on every colorway.
The fit looks wrong on the body
An on-model render can drape the garment in a way the real fabric never would. Fix it by reviewing fit and drape against your fit samples, and rejecting renders that misrepresent how the piece actually sits.
The image fails the marketplace feed
A great image can still get rejected by a marketplace if it breaks the platform's image rules. Google and Meta both publish image requirements for product listings. Fix it by checking final images against the Google Merchant Center image guidelines and Meta commerce requirements before you push the feed. More on the feed itself in the marketplace optimization workflow.
What AI should not decide about your imagery
AI generates. A human approves. For imagery, the decisions that stay with people are the ones that protect trust.
- Product fidelity. Does this still look exactly like the garment that ships.
- Color accuracy. Does the color match the standard and the sample.
- Fit and drape. Does the garment sit on the body the way the real fabric does.
- Representation. Are the model choices appropriate and on-brand.
These are not formatting tasks. They are brand and accuracy calls. The job of the tool is to do the generation and the busywork, then stop and ask a person to sign off. That approval gate is the difference between fast and reckless.
What to look for in an AI product image tool
If you are choosing a tool, look for these.
- It starts from your real product, not a from-scratch generated garment.
- A full pipeline: cutout, ghost mannequin, on-model, and recolor, not just one trick.
- Color standards so colorways match and stay consistent.
- An approval gate on every image with product-fidelity checks.
- Channel-ready exports sized for PDP, feeds, and ads.
- Connection to the rest of the product, so imagery, copy, and feed read from the same approved item.
That last trait is the real unlock. On-model imagery is one part of a complete PDP asset pack. When imagery is generated next to PDP copy, video, and feed attributes from the same product, the whole page ships together instead of in pieces.
How AI on-model imagery affects your PDP and launch
On-model imagery is upstream of your storefront, so getting it faster changes the launch, not just the photos.
When every product, including the long tail and every colorway, can have an on-model image without a shoot, your whole catalog looks finished on day one. The page stops reading like a placeholder. The shopper sees fit and scale on the products that used to launch as flats.
It also unblocks the calendar. You no longer wait for samples in every color before you can show them. You photograph one, generate the rest, and launch the full range together.
And it connects to the bigger machine. The same approved product that drives the imagery also drives the PDP copy and feed, the marketplace listings, and the social campaign. Imagery is where the storefront starts to feel real, on the way to a full collection launch.
How Kampana creates on-model imagery
Kampana is an AI product creation OS for fashion brands. It turns one product into design, 3D renders, tech packs, PDP imagery, B2B sell-in kits, marketplace feeds, and social campaigns, on a node-based canvas with approval gates.
For imagery, Kampana runs the full pipeline from one garment photo. The ecommerce PDP asset pack workflow takes your product and produces the image set the page needs, with an approval step on every asset.
What you get
- A clean cutout from your garment photo.
- A ghost mannequin shot.
- On-model renders on different bodies.
- Every colorway, recolored from one approved image.
- Channel-ready exports for PDP, feeds, and ads.
The old way vs Kampana
| Old way | With Kampana | |
|---|---|---|
| Source | Studio shoot per product | One garment photo |
| Time | Weeks | Hours |
| Colorways | Reshoot or wait for samples | Recolor from one shot |
| Cost | High per product | Credit-based, shared pool |
| Accuracy | Real garment | Real garment + product-fidelity QA |
| Who approves | art director | human approval gate on every image |
How it works
- Drop one product on the canvas.
- Wire it to the cutout, ghost mannequin, on-model, and recolor nodes.
- Approve each product-accurate image.
- Export channel-ready files for the PDP and feed.
Pricing is credit-based. You buy from one shared credit pool, with no seats and no subscription, and there is a free starter pack to try a real workflow. Use the live credit range on the ecommerce PDP asset pack workflow page and on pricing for the current per-run cost.
Frequently asked questions
What is on-model imagery?
On-model imagery is product photography that shows a garment worn by a person, so shoppers can see fit, drape, and scale. It is the image type that makes apparel feel real, and it usually carries the most weight in a buying decision.
Are AI product images for clothing accurate enough to sell?
They can be, if they start from your real garment and every image is approved for product fidelity, color, and fit. The risk is an image that drifts from the actual product, which is why a human approval step matters. AI does the generation; a person signs off.
What is a ghost mannequin image?
A ghost mannequin, or invisible mannequin, shows a garment with the shape of a body but no visible person. It reads as a clean catalog shot and works across the PDP, marketplaces, and ads. It is one of the most reused image types in apparel ecommerce.
Can I make every colorway from one photo?
Yes. Recolor takes one approved image and generates every colorway from it, tied to a color standard so the colors match. This removes the wait for color samples to arrive before you can show them.
Do AI fashion images pass Google and Meta feeds?
They can, if they meet the platform image rules. Both publish requirements, such as the Google Merchant Center image guidelines and Meta commerce policies. Check final images against those rules before pushing the feed.
Should I stop doing photoshoots?
No. Shoots are still right for hero campaigns and brand-world imagery. AI is best for catalog depth, colorways, and speed. Most brands use both and decide per product.
Will AI replace fashion photographers?
It changes where they spend time more than it replaces them. The creative direction, styling, and hero storytelling stay human work. The repetitive catalog and colorway production is where AI removes the grind.
What image set does a strong PDP need?
Usually a clean front, a back, one or more detail crops, and at least one on-model view, plus a short product video where possible. Usability research from groups like the Baymard Institute points to product imagery as central to how shoppers evaluate an item.
The bottom line
On-model imagery is what makes apparel believable. It shows fit, drape, and scale, and it is usually the image that earns the sale. The reason brands skip it was never desire. It was the cost and the calendar of a photoshoot.
AI product images for clothing change that math, but only when you treat them as a pipeline and not a magic button. Start from your real garment. Build the cutout, the ghost mannequin, the on-model render, and the colorways in order. Approve every image for product fidelity, color, and fit. Keep the shoot for the hero moments and use AI for the depth.
Do that and your whole catalog looks finished on launch day, colorways and all, because your ecommerce finally starts with the product instead of after it.
Start creating, free. Build a complete PDP pack, or explore fashion workflows to see how imagery connects to copy, feeds, and campaigns.
Send one product URL. Kampana turns it into a mini campaign pack.